Setting up a new Mac is definitely not an everyday task. It's usually a long process which must be done in order to get an efficient station to work.In this article, I want to show you, how I approach to configuring my macOS. I will share with you whole the process, with the programs and the preferences I usually use. I use my to do it my MacBook Pro M1, although I also believe this can be used for any other modern macOS systems based on Apple-silicon Architecture. Hopefully you will also find it helpful. Ok, let's go!
Keeping this article up-to-date
Setting up new Macs is not for me an every day task. Usually I do this task maybe once every 3-6 years. Although when I do, I also try to keep these instructions up-to-date, as I also often get back to them and using myself. Nevertheless, there could be situation when you may read this article, some things could be little outdated. Don't be worry, things in macOS world in last few years evolving so rapidly that is hard keep up with it. If you see something that won't work properly, please toot me, or let me know via contact page, so I could fix it. Thanks a lot in advance! 🤘
good internet connection (as there will be plenty things to download)
something to drink
positive mood 😉 - I will try to make it as easy as possible for you with good dose of explanation
Essential Variables
Remember to export $DOTFILES_DIR variable. This variable will be used to quicker and more efficient setup of this repository. Don't forget to update the path where you downloaded my dotfiles repo. 1
sh
# not having yet ~/.zshrcexport DOTFILES_DIR="/Users/$USER/privatespace/github.com/egel/dotfiles"'# already have ~/.zshrcecho 'export DOTFILES_DIR="/Users/$USER/privatespace/github.com/egel/dotfiles"' >> ~/.zshrc
First download the password manager of your choice!
Optionally: download browsers extensions for easier usage
Apple Developer Tools
Unfortunately many programs will need Apple developer tools, so we install them as well via terminal command. Pay attention as this step might take a while... (this step took me ~10-15min)
sh
xcode-select --install
Problems with installation via terminal?
In case of problems with installation via terminal, follow this URL from StackOverflow to see more information.
Apple Silicon - Rosetta 2
Some programs may require installing Apple's rosetta due to compatibility with Apple Intel apps - more in here.
Question
This program maybe required for docker installation.
/bin/bash -c "$(curl -fsSL https://raw.githubusercontent.com/Homebrew/install/HEAD/install.sh)"# disable analyticsbrew analytics off
Brew useful programs
Here I want to share with you some useful programs divided in sections. The list is quite large and divided in sections synchronized from time-to-time by me with Brewfile in my dotfiles repo (scroll below for more). So feel free to install or omit some if you'd like.
FYI: I'm installing usually the packages from my dotfiles. If you are interested take a look on my Brewfile. There you fill find similar sections like above with some explanation "why?" and/or "what for?" some programs are used.To install directly from Brewfile you can execute this:
sh
# to install directly from Brewfile (without cloning)curl https://raw.githubusercontent.com/egel/dotfiles/main/configuration/Brewfile -o ~/Brewfilebrew bundle install --file=~/Brewfile
Update 2026-08-14: Although even when keeping my Brewfile up to date, the brew bundle packages changes so dramatically fast, that I would recommend to install the packages manually looking at the list (or use installation groups I provided above). This is also a good way to check if you really need all those packages.
Hostname
I like to change the default hostnames in macos to something more appealing like mforge, but you can pick any name you like.
Check current values before setting the new one
Before making any --set you can check what current value is set. you can do it for example like this:
sh
scutil --get ComputerName
sh
sudo scutil --set HostName mforge # primary hostname;sudo scutil --set LocalHostName mforge # Bonjour hostname; name usable on the local networksudo scutil --set ComputerName mforge # computer name; this one you eg see in finderdscacheutil -flushcache # flush the DNS cache
Next time after restarting your mac, all should be set.
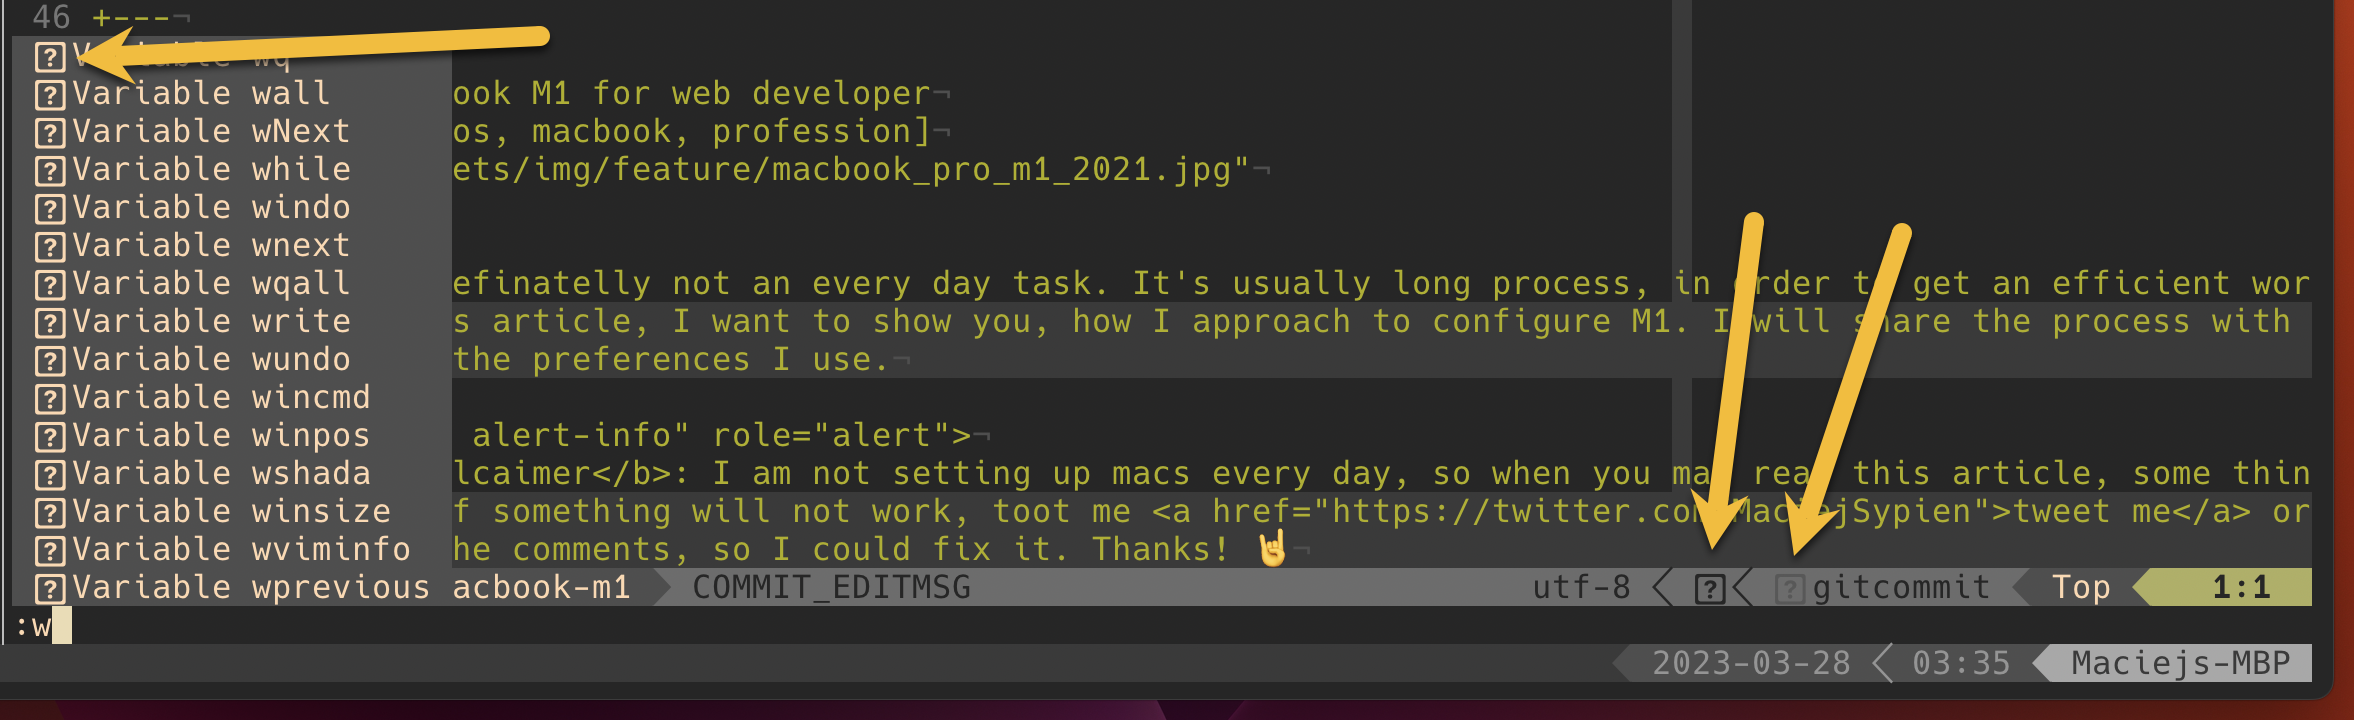
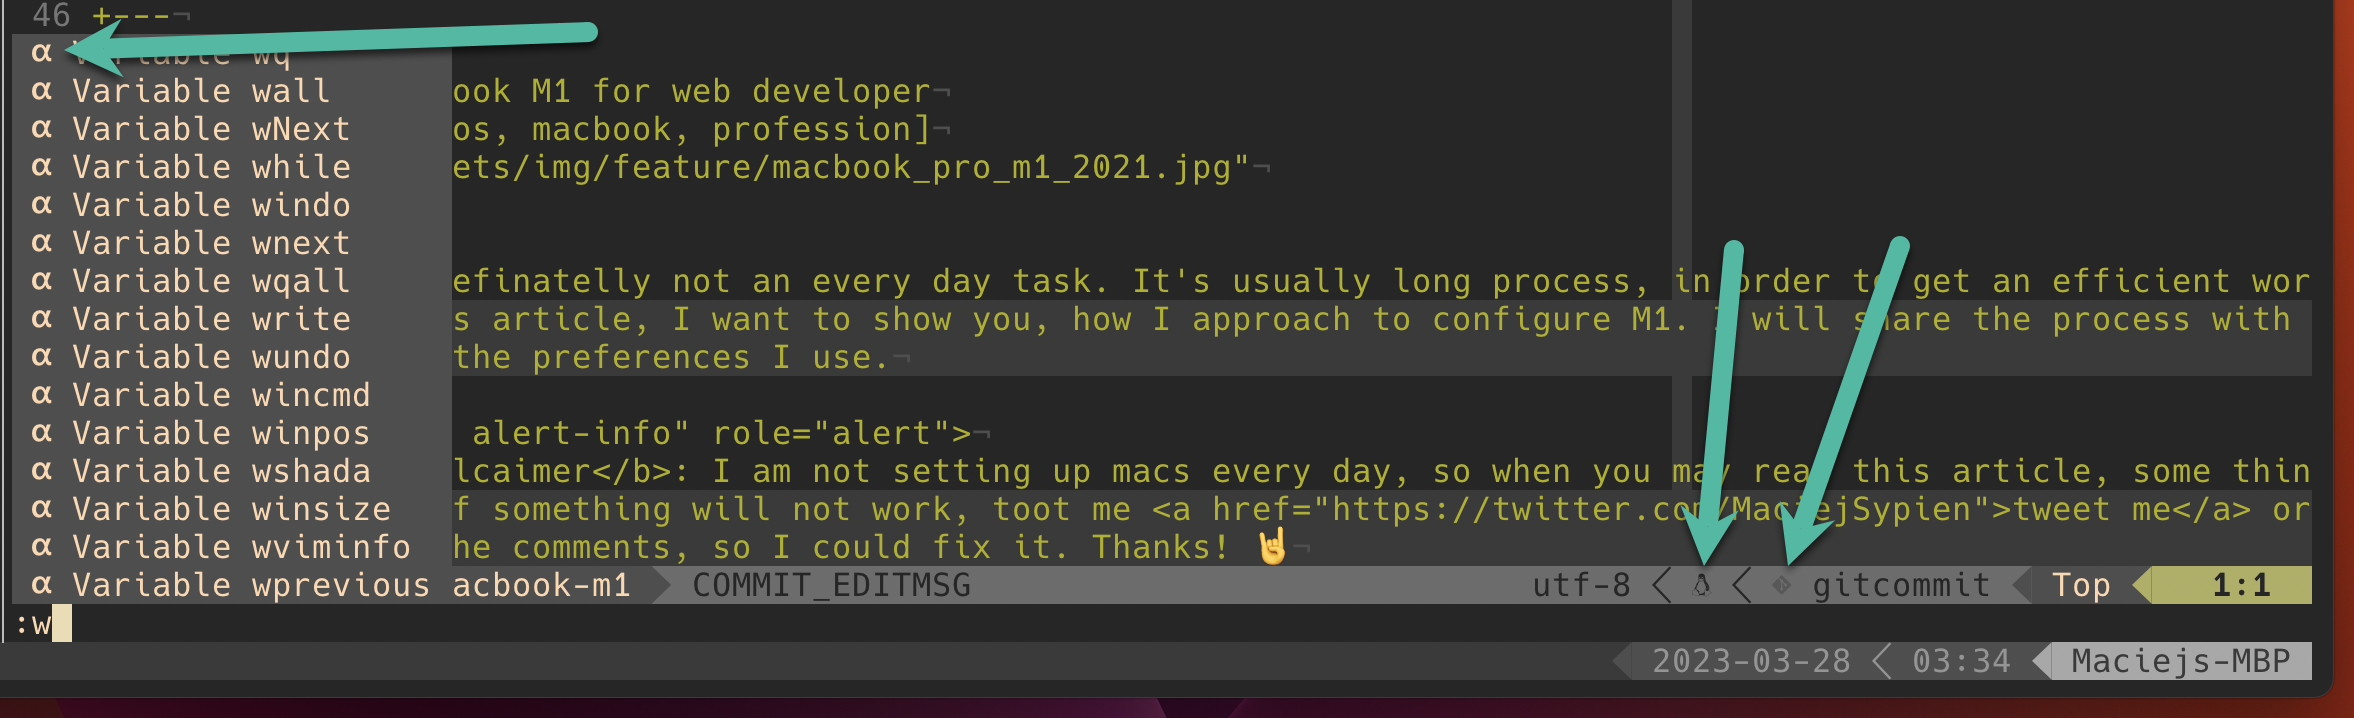
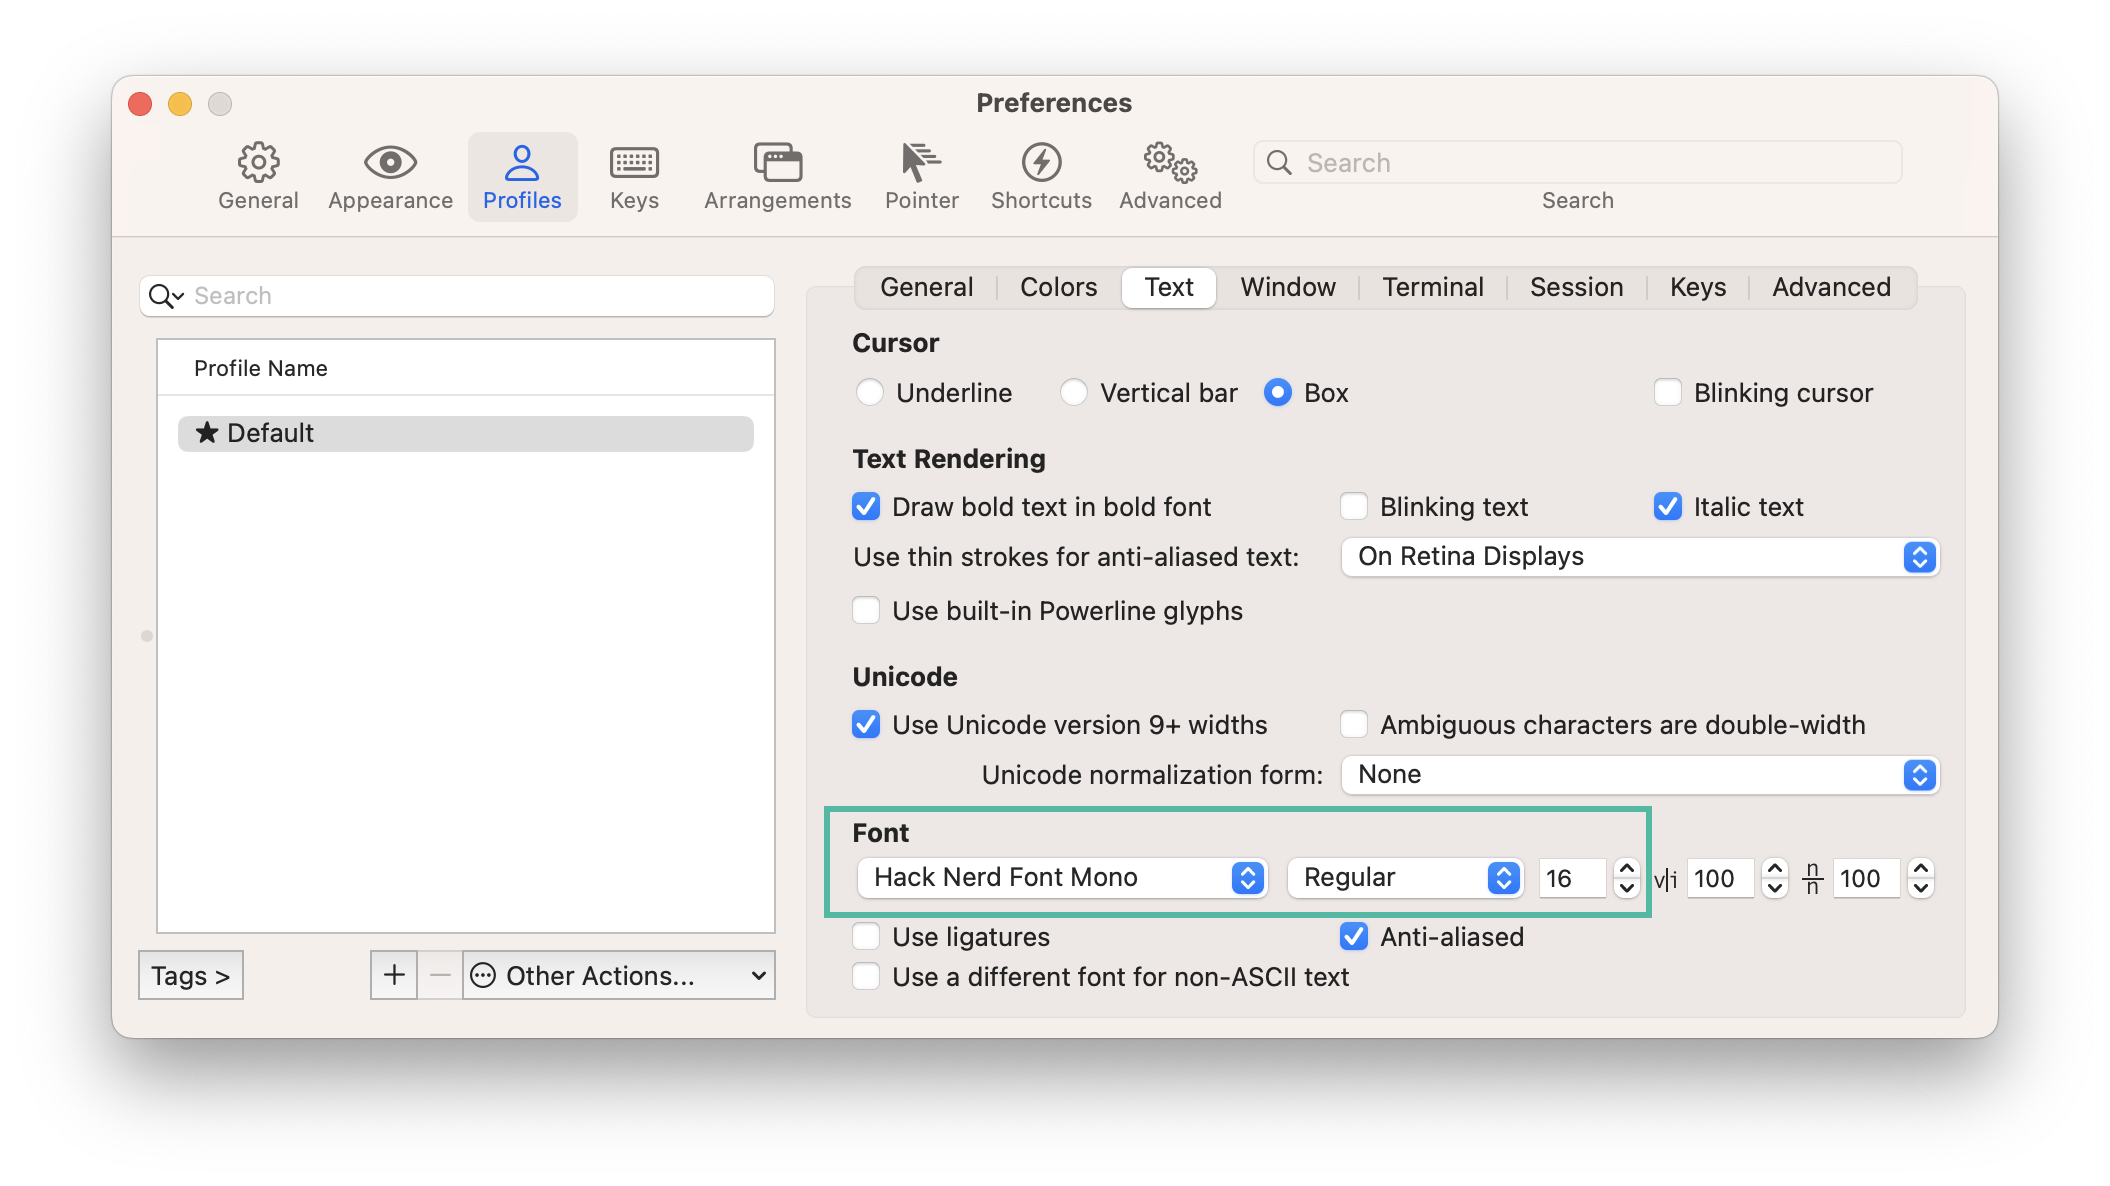
If you like hack font, do not rush with installing it via: brew install font-hack. Instead you may want to have Hack Font with Powerline symbols from the NERD Fonts www.nerdfonts.com/font-downloads. To see a small difference take a look on screenshot below with Neovim.
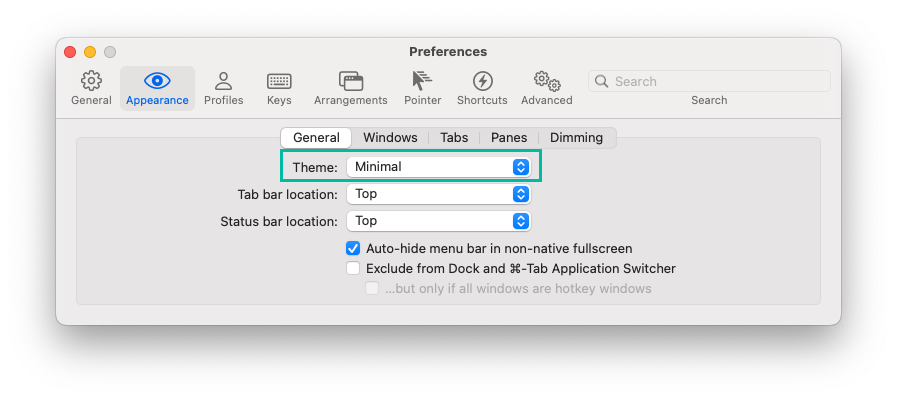
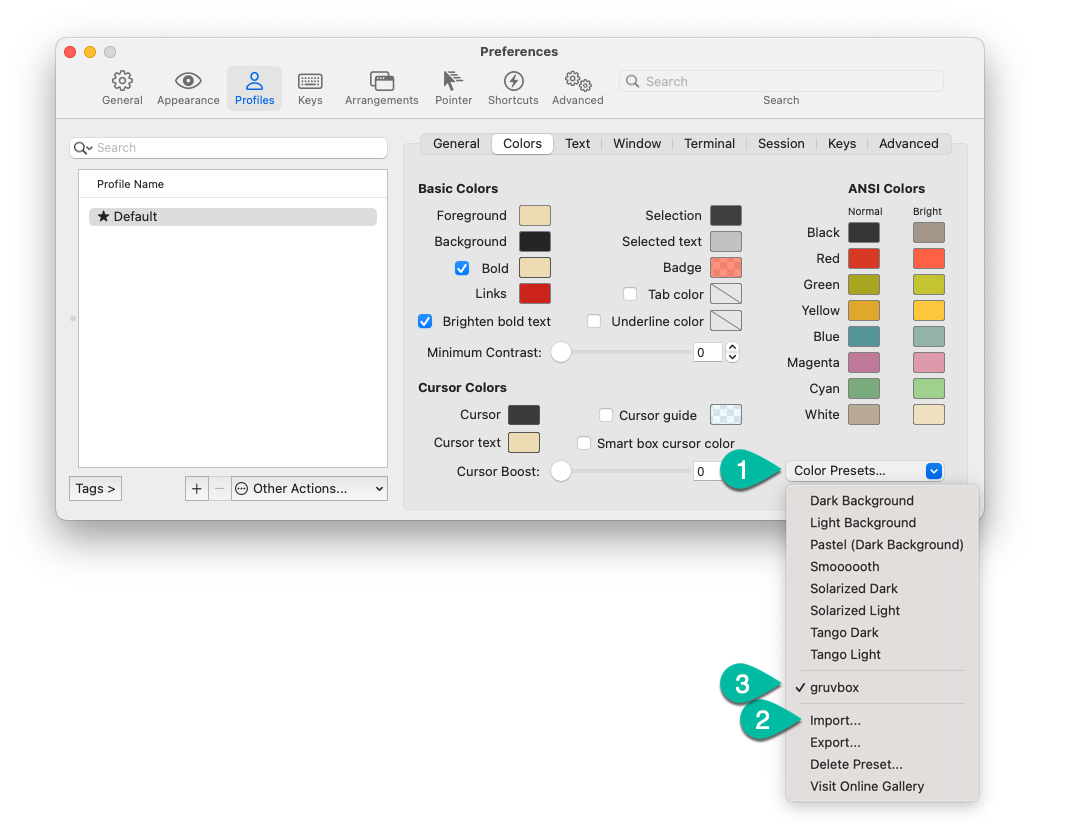
Import downloaded gruvbox color preset into iTerm (2), and after importing activate theme (3).
Iterate through the arguments of previous commands - this is awesome feature of ZSH shell, so if you are interested follow my other post how to loop through previous arguments.
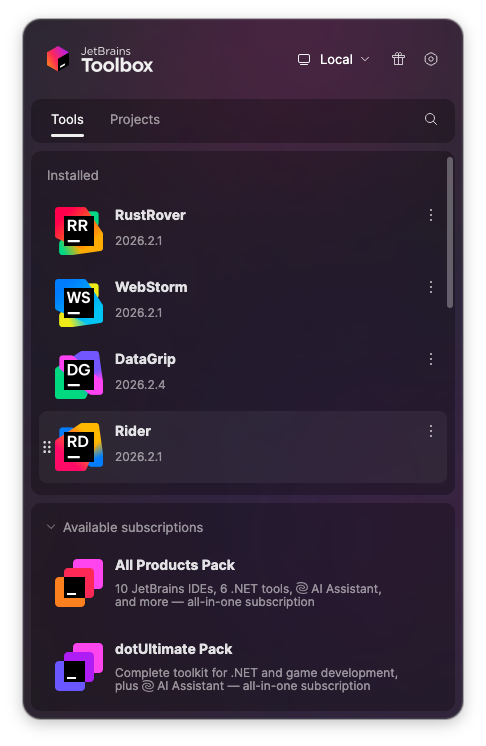
IDEA - work coding IDE (especially GoLand, DataGrip, WebStorm)The most efficient way is to download IntelliJ ToolBox App which will allow you to track and update all IntelliJ products in one place.
I like to have my projects organized in one place base on what it's purpose of it.
I usually create a 3 directories/spaces (private, work and public) that have different purposes. The private space is for my private projects, the work space is for my work projects and the public space is for any public projects that I locally use.
Separation of the spaces also allow to use different git configuration for each space. When I work on my private projects, I use my private git use my personal git configuration, when I work on my work projects, I use my work git configuration, and when I work on public projects, I use my public git configuration. This is so extremely simple and useful to use correct git credentials for each of those spaces without need for any manual changes.
Git
I put this out of dotfiles as git is essential to do any further steps. Later we will update .gitconfig to be in synch with our dotfiles repo.
Later in GPG section, we will make sure that gpg keys will be properly added to .local & .local_work files, as they will be needed to sign the commits.
For linux & macOS (Intel), at this moment you would need to run this command git config --global gpg.program $(which gpg), so the path to gpg program can be correctly updated in .gitconfig2.
Git ignore global
There are some types of file that I usually want to ignore in all my git repositories3.
My favorite git diff viewer is delta and I use it for years. It's very simple, but at the same time very powerful especially for human-readable diffs. I highly recommend to use it, and my git configuration is already prepared to use it. If you want to use it, just install it via brew:
sh
brew install git-delta
SSH
SSH is generally a very private space. It should not be likely sharable with anyone - let me tell you a secret how to keep it secure.
Create ssh keys
I love the GitLab's page for the configuration of SSH keys. It's very clear, and all info what needs to be done is there explained, so use it!
To keep it clean use a protected directory to load your SSH configurations for each personal, or clients/servers, like in the example below:
sh
mkdir -p ~/.ssh/config.d
This will later allow you to have different configuration for each of your personal, work or client servers.
~/.ssh/config.d/personal
~/.ssh/config.d/work
~/.ssh/config.d/client1
~/.ssh/config.d/client2
If you create a new file in the ~/.ssh/config.d/ directory, you can add all your ssh configuration.
sh
$ cat <<EOF | sudo tee ~/.ssh/config# Include additional configuration filesInclude config.d/*EOF
This settings within ~/.ssh/config allow me to have different configuration for each of my personal, work or client servers inside the ~/.ssh/config.d/ directory. For example, I can have different ssh keys for each of those servers, and I can also have different settings for each of those servers - this is very useful when I work with different clients, or when I have different personal and work servers.
Security warning
Many security books advice to load only the things you need and not to load all the configs files at once. They would be right, so I would recommend to load only the files you need, and not to load all the configs files at once.Additionally Make sure that the permissions for the ~/.ssh/config.d/ directory and all files inside it are set to 600 (read and write for the owner only). This is important for security reasons, as it prevents other users from reading your SSH configuration.
Info
If you want you can also use ssh-agent, but if you plan to use GPG to sign messages, the ssh-agent name you can simply replace with gpg-agent - all should work fine.More information you can find in here: gpg-agent instead of ssh-agent.
Secure your SSH keys
You may get message like this when you try to use your SSH keys:
sh
johndoe:dotfiles/ (main✗) $ git push@@@@@@@@@@@@@@@@@@@@@@@@@@@@@@@@@@@@@@@@@@@@@@@@@@@@@@@@@@@@ WARNING: UNPROTECTED PRIVATE KEY FILE! @@@@@@@@@@@@@@@@@@@@@@@@@@@@@@@@@@@@@@@@@@@@@@@@@@@@@@@@@@@@Permissions 0777 for '/Users/johndoe/.ssh/id_ed25519_johndoe_at_gmail_com' are too open.It is required that your private key files are NOT accessible by others.This private key will be ignored.Load key "/Users/johndoe/.ssh/id_ed25519_johndoe_at_gmail_com": bad permissionsgit@github.com: Permission denied (publickey).fatal: Could not read from remote repository.Please make sure you have the correct access rightsand the repository exists.
Private keys should be protected with a passphrase. Don't worry that you'll forget it - you won't. Add this to KeyManager of your choice. This is very important for security reasons, as it prevents other users from using your SSH keys if they get access to your computer.
Additionally files and directories itself should also have correct permissions, so make sure to have them set correctly. For example:
We do not want to setup the whole path to the dotfiles repository, so we will create global variable which will help us setup whole repository and files with symlinks to the configuration folder.
If not having yet your .zshrc as you will configure it later, then just export the var with the absolute path to your dotfiles root dir (don't forget to adjust it to your project location). For example like following:
sh
# if not having ~/.zshrcexport DOTFILES_DIR="/Users/$(whoami)/privatespace/github.com/egel/dotfiles"# if you already have ~/.zshrcecho 'export DOTFILES_DIR="/Users/$(whoami)/privatespace/github.com/egel/dotfiles"' >> ~/.zshrc
Re-linking the files that was directly downloaded from the repo, in order to get full synchronization with the private dotfiles repository.
sh
# gitconfigln -sf "$DOTFILES_DIR/configuration/.gitconfig" ~/.gitconfig# idea (for vim plugin)ln -sf "$DOTFILES_DIR/configuration/.ideavimrc" ~/.ideavimrc
Separate shell public config from you private stuff
Optional: In my configuration I setup few additional files, that help me manage my dotfiles in more personal, private and secure manner. Like storing private passwords, having additional private configurations, functions, variable, which I don't want to expose in my public config. Those private config files by the design should meant NOT BE STORED under version control systems.If you also decide to use them, also make sure the files have correct permissions, and apply only for you and nobody else in system.
At this moment you should check if your connection is established. Running the command the second time should give you message with your git user.
sh
ssh -T git@gitlab.com# run it 2nd time, to get user$ ssh -T git@gitlab.comWelcome to GitLab, @john.doe!
GPG
Do you know why signing commits is important?
Before starting this section make sure you know and understand why signing your own commits may be so important for you.I better explain this in my another article The lesson of verifying Git commits.
Let's start with basics, like linking configuration folder with local directory.
Now, download your gpg keys (private & public) for all your accounts private (or/and work), as we will add them to gpg configuration in order to sign your things (like commits, private emails).
Get your gpg fingerprint as we will need to use in git. Execute command below and get "signingKey" = last 16 chars of your fingerprint key. (I add arrow, to make it easier for you).
sh
$ gpg --list-secret-keys --with-fingerprint --keyid-format LONG your@email.com |- this would be your "signingKey" ------- |- or here ▼ |sec rsa4096/RPGLBRKNFTAZ2S9K 2019-03-17 [SC] ▼ Key fingerprint = VXE7 T2QX FCJZ YQ6L BEGJ MLMM RPGL BRKN FTAZ 2S9Kuid [ unknown] John Doe <johndoe@example.com>ssb rsa4096/EBEE77C5734494A6 2019-08-23 [E]
Restart gpg-agent in order to use latest configuration.
sh
$ killall gpg-agent2023-03-27 15:13:12 gpg-agent[2253] SIGTERM received - shutting down ...2023-03-27 15:13:12 gpg-agent[2253] gpg-agent (GnuPG) 2.4.0 stopped$ gpg-agent --daemon2023-03-27 15:14:46 gpg-agent[2253] gpg-agent (GnuPG) 2.4.0 started
Fill the key in ~/.gitconfig.local. So it's look more-less like:
Test applied config by reloading terminal and commit something, to see if your commits are signed successfully.
sh
git commit -S "test commit with signing"
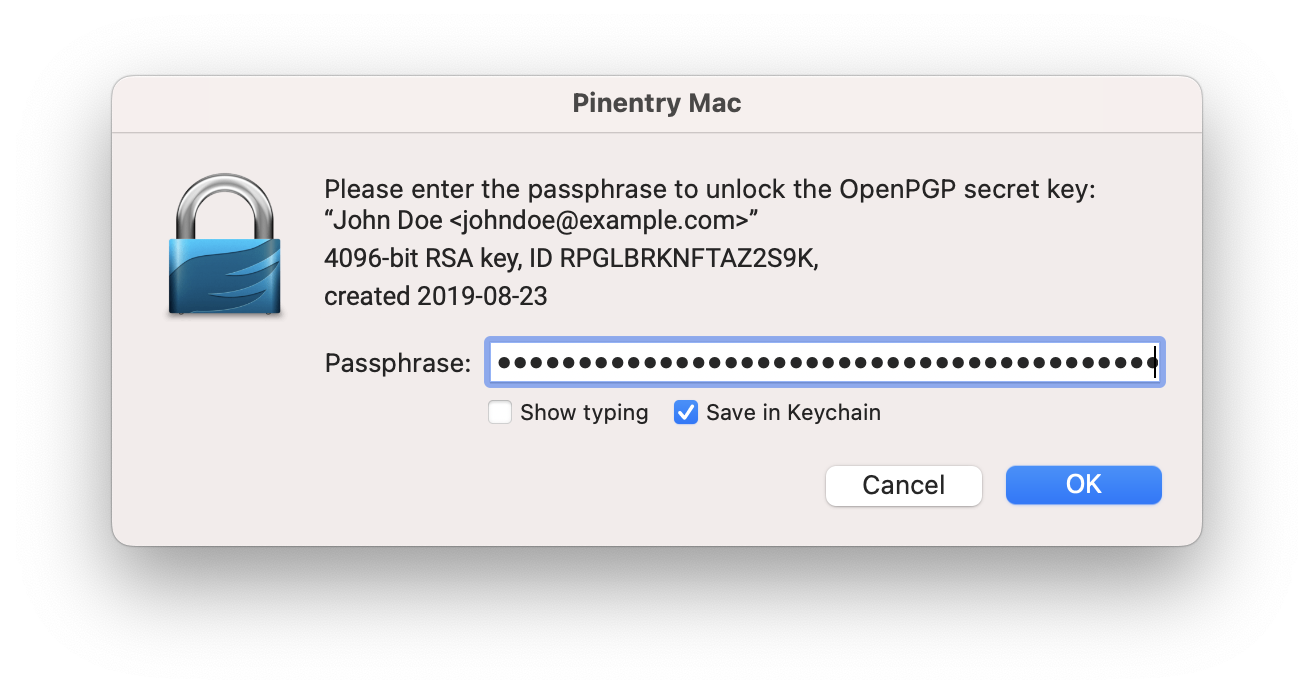
If everything will went successfully, you should get pinentry window, like the one below:
Vim & Neovim
Without a doubt vim is the king of simple text editors. Many of you may argue, but I don't want to lead you astray 😆. Fun story is when I discoverd vim many, many years ago, I was so much confused about this program and ask myself:
Let's start as usual with configuring vim and neovim.
Neovim
Since v0.6.1 from around 2021/20224, the nvim becomes de-facto my primary text editor of choice.
sh
mkdir -p ~/.configln -sf "$DOTFILES_DIR/configuration/.config/nvim" ~/.config/nvim# Open nvim and install plugins via:PlugInstall
Vim
sh
# vim (after switch to nvim, using this config rarely)ln -sf "$DOTFILES_DIR/configuration/.vimrc" ~/.vimrcln -sf "$DOTFILES_DIR/configuration/.vim/" ~/.vim/# Open vim and install plugins via:PlugInstall
# link configurationln -sf "$DOTFILES_DIR/configuration/.tmux.conf" ~/.tmux.confln -sf "$DOTFILES_DIR/dotfiles/configuration/.tmux-osx.conf" ~/.tmux-osx.conf# install tmux-plugin managergit clone https://github.com/tmux-plugins/tpm ~/.tmux/plugins/tpm# type this in terminal if tmux is already runningtmux source ~/.tmux.conf
Open new tmux session by typing in terminal tmux new -s my-new-session-name.
Next, install plugins from the .tmux.conf file via pressing prefix + I (pay attention, by default it's big "i" letter key)
What is Tmux Prefix?
For those who don't know what the Tmux Prefix is - it is a combination of keys that user have to press in order to activate and run some actions/mode.The default Tmux command key Prefix is ctrl + b. If you will use my tmux config I also add additional prefix ctrl + a, because it easier to reach with hands on standard ANSI keyboard.For example, if you want open a clock action/mode, you have to press in the same time, the prefix combination (which is ctrl + b) then release and press t. If you succeed, you should see some nice clock mode inside tmux.
ZSH + oh-my-zsh
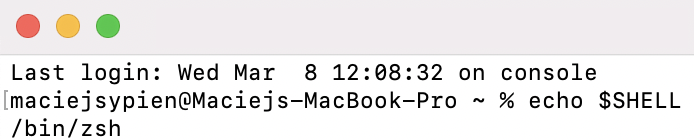
I was positively surprised that by default M1 use zsh shell.
Install missing oh-my-zsh
sh
sh -c "$(curl -fsSL https://raw.githubusercontent.com/ohmyzsh/ohmyzsh/master/tools/install.sh)"
Bash completions
sh
# for brew 4 or higherbrew install bash-completion@2
Theme
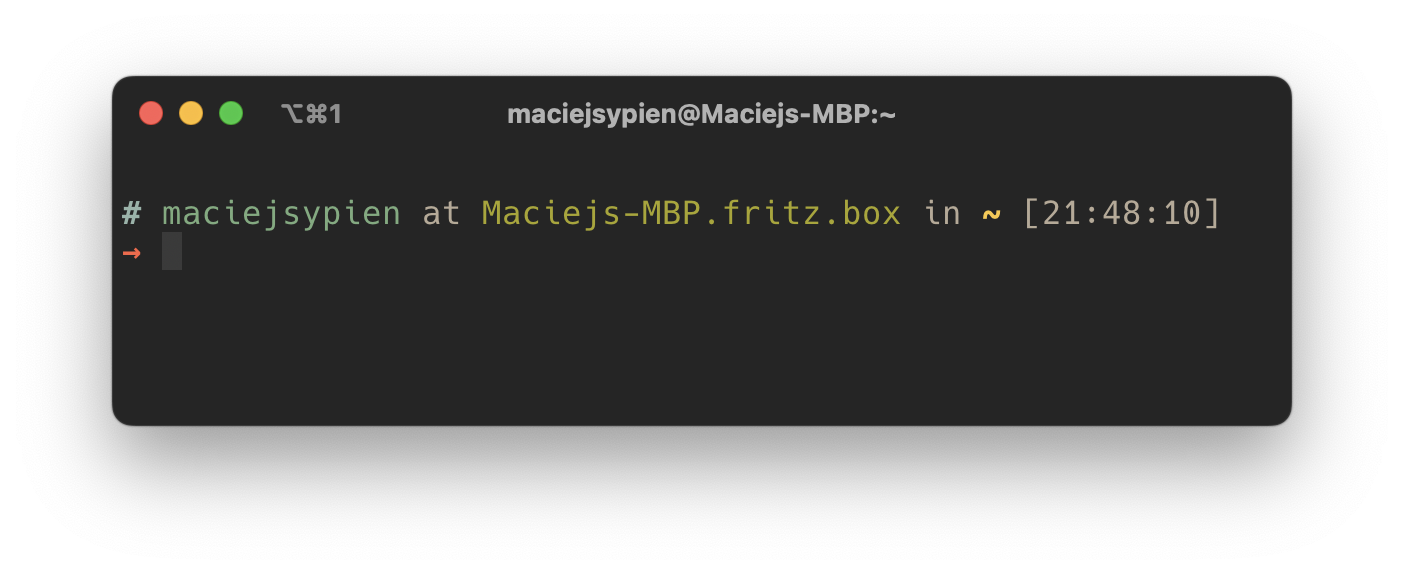
For years I use honukai theme, as it gives me best orientation in the shell.
Visit docker website to download and install your docker service.
You may need install "rosetta2".
Docker buildx
In order to compile docker images for different architectures we need buildx from docker. Here is how to set it up.
sh
# build new instance to compile imagesdocker buildx create --name multiplatform --driver docker-container --bootstrap# Set this builder as the default for subsequent buildsdocker buildx use multiplatform# Verify the builder configuration and supported platformsdocker buildx inspect multiplatform
System Preferences
Screenshots
For all types of screen records, I use default mac screenshot tool, with some combinations from Snagit. The combination of both give the fastest experience to finish a screenshot or record a screen for documentation.
I like to have one path for all type of screen records and usually choose something like:
sh
# create directory for filesmkdir -p $HOME/Documents/Screenrecords# Set new default pathdefaults write com.apple.screencapture location "$HOME/Documents/Screenrecords"# kill current UI to apply new write path (no worries, it will not destroy anything)killall SystemUIServer
Screenshot shadows
After making screenshot you can also Enable/Disable an image shadows that is created with it:
sh
defaults write com.apple.screencapture disable-shadow -bool true # or set false to disable# apply changeskillall SystemUIServer
Finder
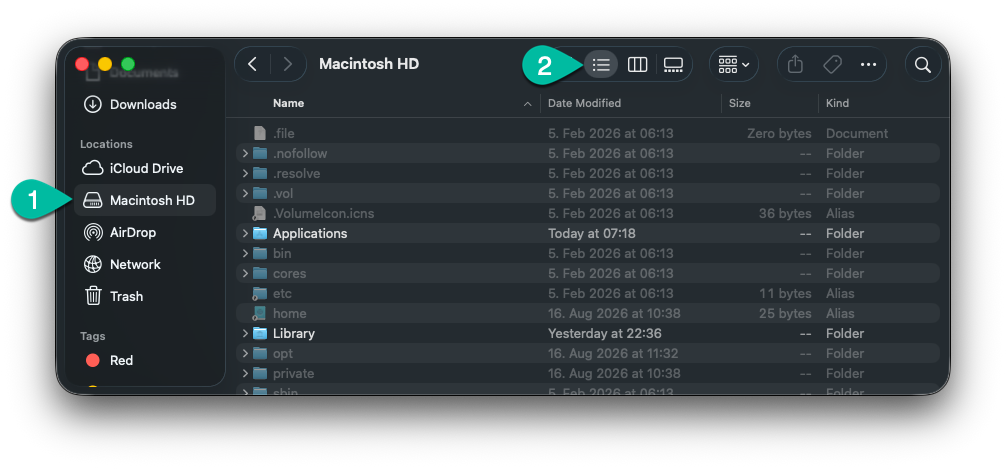
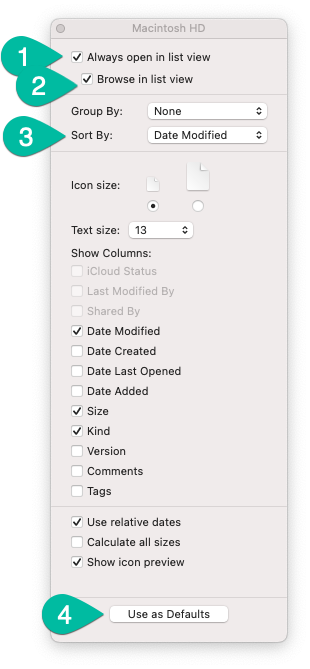
Setup list view as a default view for all folders.
Open hard drive view (usually it's called "Macintosh HD")
Press ⌘ + j
Next after accepting "Use as Defaults", right away open new terminal windows and execute the command to remove all .DS_Store files from system used by the Finder, in order to remove all overrides5. This may take few minutes to scan all locations so leave it be for moment otherwise you may get error find: fts_read: Interrupted system call and would need to re-run it.
Along the way system may ask you for your macOS user password (this action may require an admin account) and also may ask for permission to enter and scan for certain directories.
If you let command to remove all previously created custom .DS_Store files, then you'll be able to open every new Finder window with the default settings, you just defined. Easy!
sh
sudo find / -name ".DS_Store" -exec rm {} \;
Terminal: No such file or directory
While scanning there will be lot of directories that will be blocked by system during the scan like this below.
plaintext
...find: /System/Volumes/Data/mnt: No such file or directory...
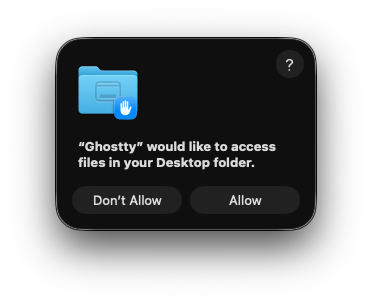
This is normal 😌. Tho for some of your public working directories like Desktop, Documents, Pictures, Music, ect. then it may ask for an extra permission to enter.
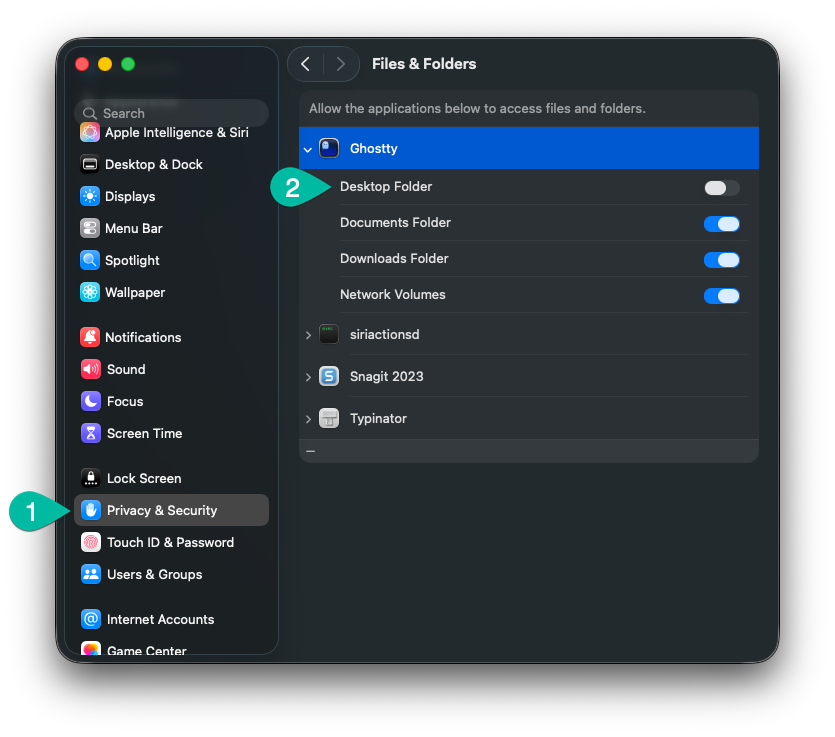
Terminal: Did you block access while scan?
If by accident you press and block the scan, you can always change this in Systems Settings > Privacy & Security > Files and Folders, then locate your terminal and lock/unlock it 😊
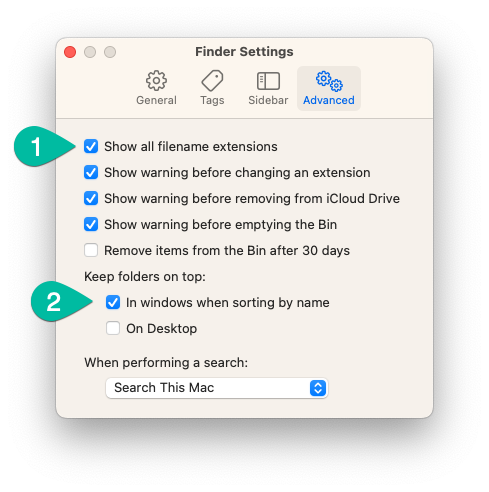
Additionally, I like to display file extensions and sort folder first, therefore my usually setting for finder window is like following:
Open finder
Press ⌘ + , to open window "Finder Settings"
Trackpad
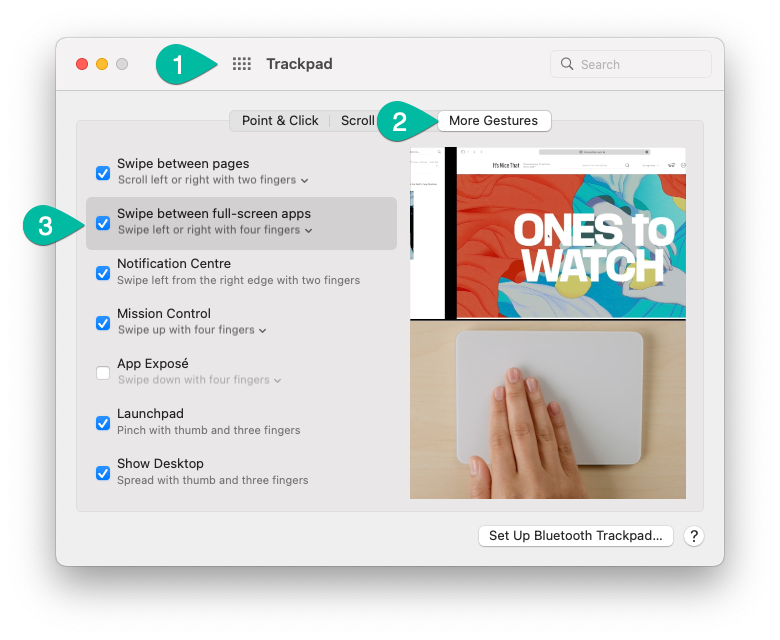
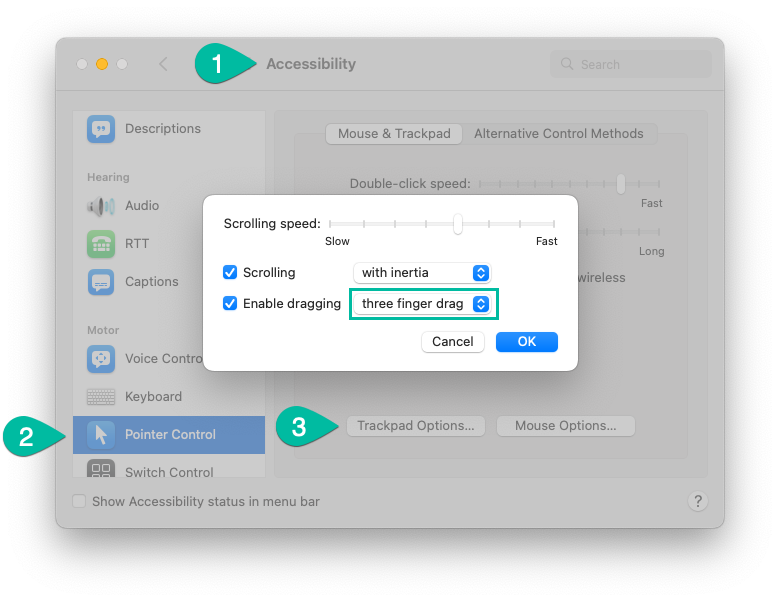
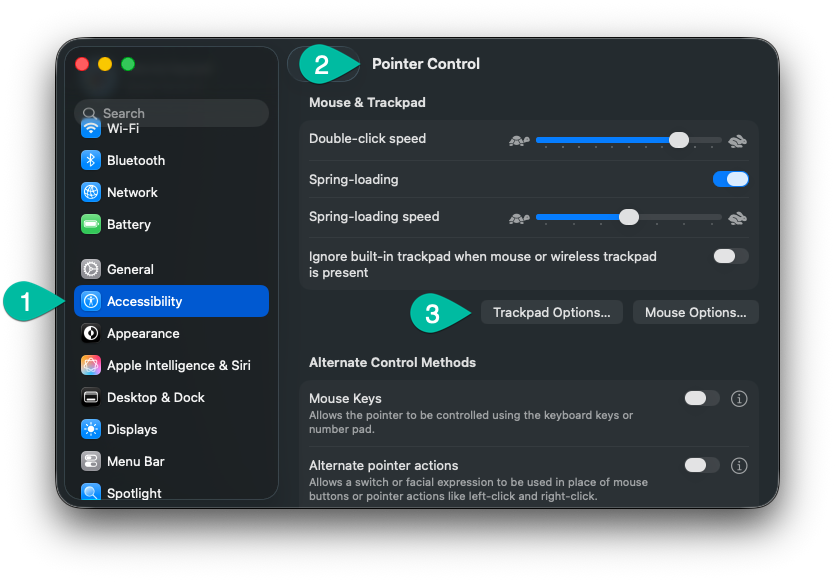
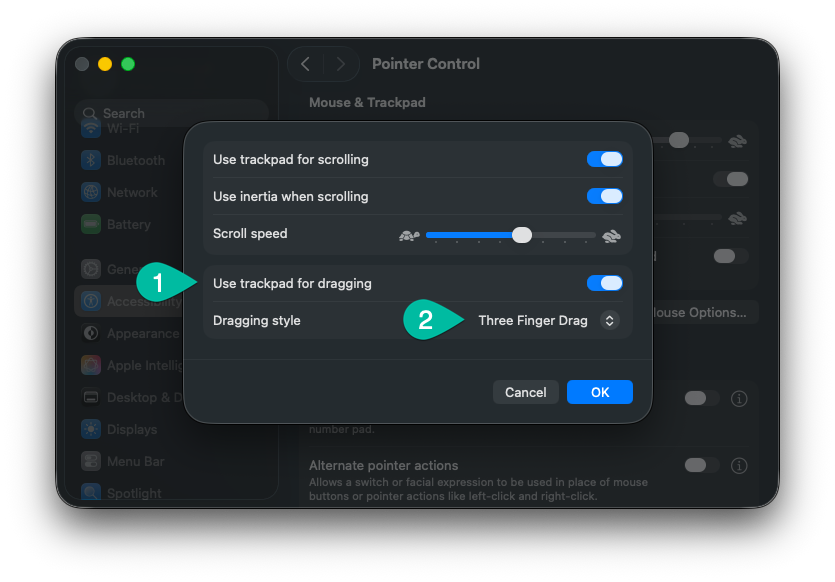
For the mac trackpad I like to setup 2 things I am so get used to, that I cannot imagine work without:
Swiping between screens with 4 fingers
Dragging elements with 3 fingers. I believe this is amazing feature, that not many people know about it. So shout out, use it, it's great!
Displays
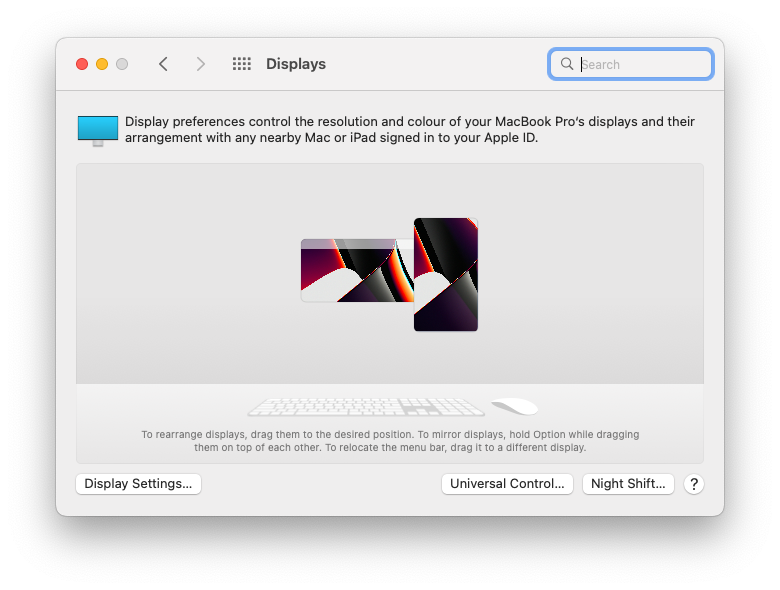
I think this is pretty standard, although having one screen in vertical position is very helpful as this sometimes enable to look on things from different perspective.
Desktop & Stage Manager
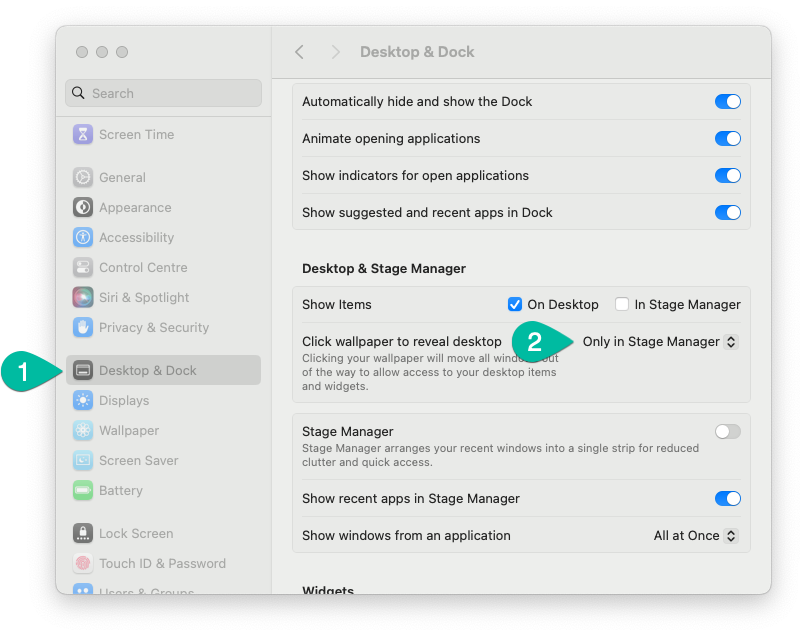
In new version of macOS Sonoma, they introduce widgets on the desktop. One of the new default
features is when user will click on the background it reveals the desktop.
I prefer to disable this feature, and below paste small image screenshot to help finding it.
Disable system dictation
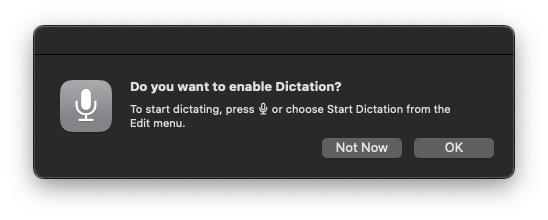
I usually disable system dictation as it sends all to cloud and I prefer offline dictation. For this I use Mac Whisper.
Using macOS Sonoma?
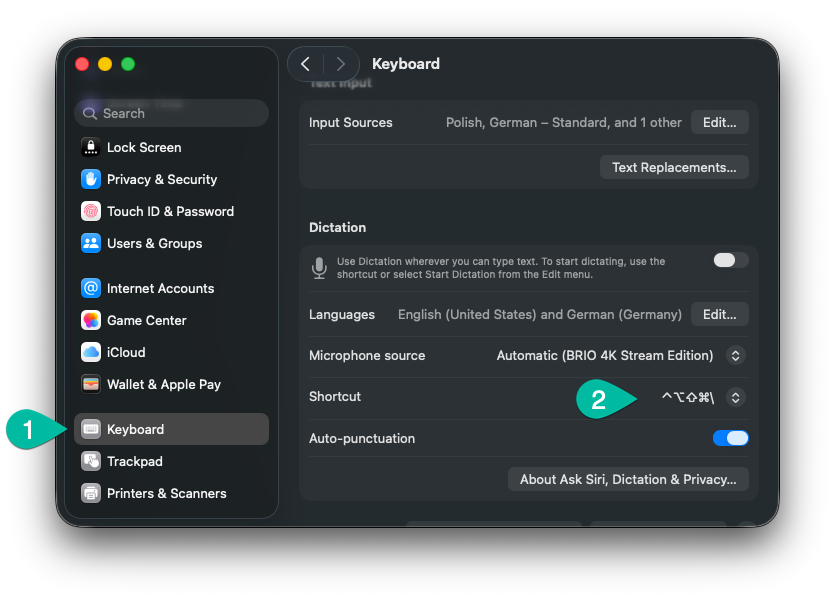
At the moment of writing macOS Sonoma recently removed the option to completely disable this annoying dictation feature on M1 MacBooks. Hopefully this will be fix in future.
The least annoying option I found so far, is to change the current key to the custom mapping that is difficult to click. For example Ctrl + Option + Shift + ⌘ + \
I don't use node installed via brew, I rather prefer using nvm. Link to nvm github page.
sh
# install nvmcurl -o- https://raw.githubusercontent.com/nvm-sh/nvm/v0.40.7/install.sh | bash# install specific versions of node and set you default preferencenvm install 26nvm install 24nvm install 18nvm alias default 26# testwhich nodenode --version# apply changessource ~/.zshrc
Global node packages with nvm
While using node (actually multiple versions of it) I was searching for generic way to install global packages. This is because my version of setting up of node, change the node version and also the global packages installed with it (see my dotfiles config), so each node version that will be switch use the packages assigned to this version - I love this solution.
To install node packages as global for current version of node you can use simple txt list like below.
Of course, you can extend this list to other programs you need. Here is just sample how to do it yourself.
Nowadays, npm is getting bit more secure then it was at least few years ago - which it very good! This is especially important against malicious scripts which were very popular in the npm ecosystem. So in order to be able to execute some of the scripts, you must first allow to execute them. You can do it like following:
sh
npm config set allow-scripts=yarn,core-js,@parcel/watcher,unrs-resolver --location=user
yarn
Yarn is connected to version of node running, so best way to install it is via current used node/npm.
Tip
If you use many different node versions on same PC like me (for example via utilizing nvm), you also should remember to install
yarn for each of those different node versions - It's important because installing yarn as global package, it sit in different global node version directory. So if you use v24 and newer project use v26 already - you may not find it after switching.
I didn't found better way to install Java, like through SDK-MAN. I am not much fan of Java, but this is really awesome Java Version Manager similar to rbenv.
To install it, start with:
sh
# installcurl -s "https://get.sdkman.io" | bash`# test if succeeded (or reload terminal)skd version
SDK-MAN configuration
In case you wondering, my configuration for SDK-MAN you can find in my .zshrc
More information you can read at my configuration page for zsh shell. ↩
The reason is the architecture. After Apple migrated to ARM architecture all the programs for ARM took default paths. The Macs with intel architecture have a different names of the programs, and because of that we need to setup different path. ↩
For example .DS_Store files, which are created by macOS Finder and are not needed in any git repository. Therefore I have a global git ignore file that is used in all my git repositories. ↩